Adding Sound To Your Arduino Projects, FAST!
Recently I started working on a project where I needed to add sound, and ALOT of it too! But with the myriad of options out there it can be really bewildering as to which platform to choose.
Historically, I've always gone to my go to chip set called the CHIPCORDER from a company called Nouvoton.
I really only ever needed to add a sound byte here, a sound byte there. But in this instance, I needed to add a bunch of clips and of varying length so my beloved ISD series of chipcorder just wouldn't do.
I also needed it to be loud without a lot of external components.
Mini MP3 Player

When you do some searching for MP3 players which are Arduino driven, you get back approximately 65412316541326876132165 x 10^2316 options.
Boy... my head nearly exploded. Luckily, a buddy of mine who owns Programming Electronics Academy, just released a massive new course on this exact topic.
So I ran on over and checked out his video course. If you haven't want to learn about programming Arduino or this course in particular, you can signup for his courses here. You won't be disappointed.
After watching his videos, it became clear that the DFPLAYER from DFROBOT was the only choice.
It uses a standard SD card which gave me boodles and boodles of storage. A built in amplifier which once connected to a 3 Watt, 8 Ohm speaker is MORE than loud enough for my application.
This was the perfect combination for me, but there is a weird little hiccup I ran into and wanted to share it so that you don't waste a load a time like I just did.
First the build...
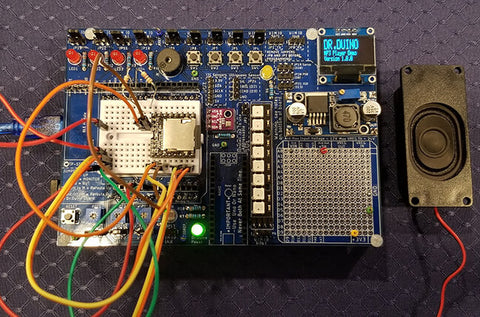
Building the Circuit
I needed a few buttons to trigger the various tracks, a potentiometer to vary to volume and a new display to output what track was being played. So I turned to my trusty Dr.Duino Explorer Edition and got it hooked up in about 34 femto seconds.
The speaker I used in the picture is a super loud yet compact 3 Watt , 8 Ohm speaker.

Then I downloaded the files to the MP3 card which is where I apparently committed the ultimate faux pa.
I just kinda plopped down the MP3 tracks randomly and then renamed them on the card to follow their folder structure.
So the first one I renamed to 0001.mp3 then the next file to 0002.mp3 so on and so forth.
From there, I whipped up some code based on some demo code directly from DFrobots page.
I tied the buttons on the Dr.Duino Explorer to trigger each sound clip on the SDCard.
So button 1 on the shield would trigger the 0001.mp3 sound, button 2 would trigger 0002.mp3 etc.
Que the image of head popping
But as I began to play around with the sounds, I noticed that button 1 would play sound 2, button 2 would play sound 1, button 3 would play sound 4 and button 4 would play sound 3.
I thought I had messed up the mappings on the switches to the sound clips so checked my code, and then rechecked, and then checked with a side of check checking.
And... it was all correct.
Then I dug into DF robots page and found this little snippet.
NOTE: The order you copy the mp3 into micro SD card will affect the order mp3 played , which means play(1) function will play the first mp3 copied into micro SD card.
So in the end, the number which I assigned to the mp3 files was irrelevant, just the order in which I copied the files down to the sdcard!!!!!
I then copied off the renamed mp3 folder from the SD card. Reformatted the SD card and then re-copied the files back to the SD card.
POOF! It all worked as expected.
What's that old saying? The devil is in the details? Well... that certainly proved true today!
Well.. until next time, I hope you found that useful.