
Dr.Duino Diagnostic Equipment Kit
Regular price
$ 328.00
$ 299.00
Sale
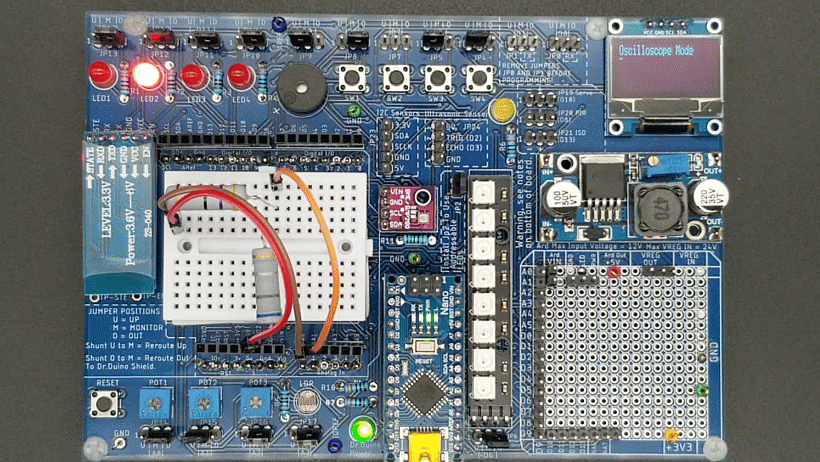
Turn Your Dr. Duino Explorer Into a DMM & Basic Oscilloscope.
As seen in Nuts & Volts Magazine.

The kit itself is made up of two separate parts, the Dr.Druino Explorer Kit and an online course called the Diagnostic Equipment Course (DEC).
The DEC is what transforms the Dr.Duino Explorer into an absolute beast of an Arduino shield.
The course has you perform several experiments which teaches you how to build a Voltmeter, Ammeter, Ohmmeter, Continuity tester and even a basic Oscilloscope.
Normally, Arduino-based kits will just provide you with a bunch of code and some schematics, but that's where this kit is just warming up.
It starts off with a neat concept which we call "Layered Learning", which is what we use to teach you the concepts of how an Analog to Digital (A/D) converter works.
A/D converters are at the heart and sole of turning your Explorer into a working Digital multimeter.
We provide an excellent video tutorial of how SAR type A/Ds work.
(SAR is short for Successive Approximation Register.)
From there, we layer on more and more complex topics slowly.
Each topic builds upon the previous lesson, which will help you understand how DMM's and scopes work using the onboard A/D.
Once you understand how the hardware works, it makes creating any project which requires A/D conversions a breeze.

Here is what you will learn!
Lesson 1Discover the difference between Analog and Digital Signals without tons of theory and explained in a very easy to understand way.
Lesson 2
Review how the Analog to Digital (A/D) converter onboard the Arduino Nano works from a hardware vantage point. Includes a deep dive into the most common type of A/D used called a Successive Approximation Register (SAR).
Lesson 3
Scaling Factors, Resistor Divider Networks, Ohms Law & Power Calculations, Limitations of a 10-Bit A/D
Lesson 4
Building a Volt Meter Using your Dr.Duino Explorer (Includes Easy To Follow Code)
Lesson 5
Building an Amp Meter Using your Dr.Duino Explorer (Includes Easy To Follow Code)
Lesson 6
Building a Ohm Meter Using your Dr.Duino Explorer (Includes Easy To Follow Code)
Lesson 7
Building a Continuity Meter Using your Dr.Duino Explorer (Includes Easy To Follow Code)
Lesson 8
Building a basic Oscilloscope (Includes Easy To Follow Code). Plots analog to digital values on the Dr.Duino Explorer's OLED.
Lesson 9
The Capstone Project | Learn how to use a state machine to change between all five of these modes.
What Else Do You Need?
Aside from your Dr.Duino Explorer and the DEC the only other things you'll need are some assorted 3-Watt resistors and dupont wires used to wire up some test circuits.
These are not included as part of the kit but chances are, you probably have them on hand anyway.
You might be wondering why 3-Watt resistors are required.
Well, that's because part of the DEC has you build a very impressive Ammeter which is capable of measuring up to a maximum of 106 mA.
If you were to drive that much current through a typical 1/4 watt resistor, well... let's just say that you'd be able to cook an egg with it.
In the course, we provide links as to where to pick them up from!
* Dr.Duino Explorer Edition REQUIRED!
** 3 Watt resistors required not included.